The Complete DIY Cushion Making & Sewing Guide: From Basic Benches to Designer Pouches
Transform Your Outdoor & Indoor Spaces with Handmade Comfort (Even if You've Never Touched a Sewing Machine!)

Let me tell you a little secret - I used to be terrified of my sewing machine. Like, seriously scared. It sat in my closet for two years gathering dust while I kept buying overpriced cushions that never quite fit my outdoor bench perfectly. Sound familar?
Then one rainy Saturday, armed with nothing but YouTube tutorials and sheer determination, I decided to face my fears. Three hours later (and yes, a few choice words), I'd created my first bench cushion. Was it perfect? Absolutely not. Did it have slightly wonky corners? You bet. But sitting on that lumpy, imperfect cushion felt better than any store-bought one ever had.
Fast forward five years, and I've made hundreds of cushions - from simple no-sew projects to elaborate tufted masterpieces. And guess what? You can do this too! Whether you're looking to make your first cushion or master advanced decorative techniques, this guide has got you covered.
Ready to Start Your Cushion Journey?
Check out our premium outdoor cushion collection for inspiration!
Shop Rulaer Cushions →Why DIY Cushions Are Worth Your Time (Spoiler: It's Not Just About Money)
Look, I get it. With Amazon delivering cushions to your door in 24 hours, why bother learning to make your own? Well, let me paint you a picture...
Remember that outdoor bench you bought last summer? The one with the weird dimensions that no standard cushion fits properly? Or how about that gorgeous vintage chair you scored at the flea market - the one that deserves a cushion as unique as it is?
Here's what making your own cushions really gives you:
- Perfect Fit Every Time: No more cushions sliding off or looking awkwardly small
- Fabric Freedom: Choose from thousands of fabrics instead of the same 10 patterns everyone else has
- Quality Control: You decide on the filling thickness and firmness
- Therapeutic Benefits: Seriously, sewing is like meditation with tangible results
- Bragging Rights: "Oh this? I made it myself" never gets old!

My first DIY bench cushion project - not perfect, but perfectly mine!
The Numbers Don't Lie:
Essential Tools & Materials You'll Actually Need
Okay, before you run out and buy every sewing gadget known to mankind (guilty as charged), let's talk about what you actually need to get started. I've divided this into "Must-Haves" and "Nice-to-Haves" because trust me, you don't need that $300 rotary cutting system... yet.
🔧 The Absolute Must-Haves
Measuring Tape
The soft, flexible kind. Mine's been through the wash twice and still works great!
Fabric Scissors
Hide these from your family. Seriously. Paper ruins fabric scissors faster than you can say "but I just needed to cut this coupon!"
Pins or Clips
I'm team clips all the way - no more pricked fingers!
Seam Ripper
Your new best friend. We all make mistakes; this little tool makes them disappear.
Thread
Match your fabric color, or go wild with contrasting colors for a designer look!
Sewing Machine (Usually)
But psst... check out our no-sew cushion guide if you're not ready for this commitment!
💡 Pro Tip from a Reformed Cheapskate:
I used to buy the cheapest thread possible. Big mistake. HUGE. Good thread = fewer breaks = less frustration = actually finishing your project. Spend the extra $2, thank me later.
✨ The Nice-to-Haves (Your Future Wishlist)
- Rotary Cutter & Mat: Makes cutting straight lines feel like cheating
- Walking Foot: For sewing thick layers without wanting to throw your machine out the window
- Piping Foot: Once you start adding piping, there's no going back
- Iron & Ironing Board: Because pressed seams = professional results
🧵 Choosing Your Materials
Fabric Selection 101
Here's where things get fun! Choosing fabric is like being a kid in a candy store, except the candy costs $8-$30 per yard. Here's my tried-and-true guide:
For Outdoor Cushions:
- Sunbrella: The Rolls Royce of outdoor fabrics. Water-resistant, fade-resistant, basically indestructible
- Canvas: More affordable, still durable. Just add waterproofing spray!
- Marine Vinyl: Great for boat cushions or anywhere that gets seriously wet
For Indoor Cushions:
- Cotton Duck: Sturdy and affordable, perfect for beginners
- Upholstery Weight Fabrics: Designed to take a beating
- Velvet or Corduroy: For when you're feeling fancy
Need Inspiration? Check Out These Rulaer Bestsellers:


Rulaer® Custom Tufted Cushion
Elevate your living spaces with unique style & support. Shop now!
View Details
Custom RV Camper Seat Cushion
Tailored for perfect fit and lasting support on every adventure. Explore now!
View DetailsBasic Cushion Making: Where Every Journey Begins
Alright, enough talk - let's make something! I'm going to walk you through creating your first cushion, and I promise it's easier than assembling IKEA furniture (and way more satisfying).
Project #1: The Classic Bench Cushion
This is where I recommend everyone starts. Why? Because bench cushions are forgiving - they're basically rectangles with attitude. No weird curves, no complex math, just straight lines and right angles.
What You'll Need:
- 2 pieces of fabric (your bench measurements + 1 inch on all sides for seam allowance)
- Foam or batting (same size as your bench)
- Thread matching your fabric
- Zipper (optional, but trust me, you'll want to wash that cover eventually)
- Your courage and maybe a glass of wine (kidding... sort of)
The Step-by-Step Process:
Measure Twice, Cut Once (Or In My Case, Measure Five Times Because Anxiety)
Measure your bench surface. Add 1 inch to each measurement for seam allowances. So if your bench is 48" x 16", cut your fabric pieces to 49" x 17".

Cut Your Fabric (Deep Breaths, You Got This)
Lay your fabric on a flat surface. If it has a pattern, make sure both pieces will match up nicely. I once made a cushion where the stripes went different directions... let's just say it became a "design choice."
Cushion Cover Sewing Techniques That'll Make You Look Pro
So you've mastered the basic cushion? Awesome! Now let's talk about taking your skills to the next level. These techniques are what separate the "oh, you made that?" cushions from the "WHERE DID YOU BUY THAT?!" ones.

Remember: every professional cushion maker was once where you are now. The only difference? They kept practicing (and probably swore a lot less than I did).
The Game-Changing Zipper Installation
I avoided zippers for YEARS. They seemed impossibly complicated. Then I learned this one weird trick (cushion makers HATE this! Just kidding, they taught it to me).
The Invisible Zipper Method That Changed My Life:
- Place your zipper face-down on the right side of your fabric
- Sew close to the zipper teeth using a zipper foot
- Press the seam open (yes, you need to iron, sorry)
- Topstitch for that professional finish
⚠️ Mistake I Made So You Don't Have To:
Always buy a zipper that's 2-4 inches shorter than your cushion side. I once bought one the exact length and spent 30 minutes trying to close the ends. Learn from my pain!
Master These Essential Techniques:
- 📍 Sew a Seat Cushion Cover Like a Pro - My foolproof method for perfect corners
- 📍 Bench Cushions for Outdoor Comfort - Weather-resistant techniques
- 📍 Master the Zippered Cover - No more wrestling with cushion stuffing
- 📍 Add Piping AND a Zipper - For when you're feeling extra fancy
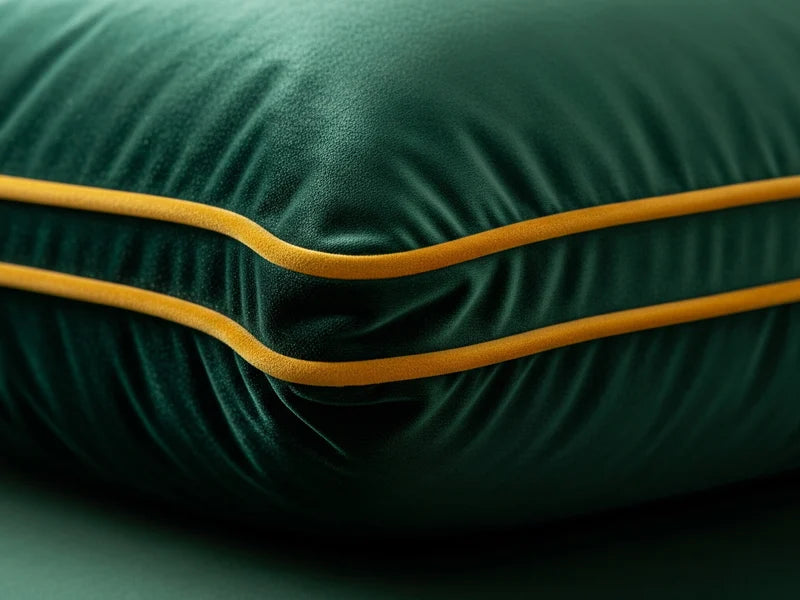
The Magic of Piping (It's Easier Than You Think!)
Piping is like the perfect lipstick for your cushion - it just pulls everything together. And contrary to popular belief, it's not that hard!
Piping 101: The Basics
Piping is just cord wrapped in fabric. That's it. That's the big secret. Here's how to add it:
Cut bias strips of fabric (diagonal to the grain)
Wrap around piping cord and sew close to the cord
Pin to your cushion edge before sewing pieces together
Level Up Your Piping Game:
Try contrasting colors! Navy cushion with white piping? *Chef's kiss* 👨🍳 Or go tonal for subtle elegance. Check out our guide on Mastering Piping on Cushions for all my secrets.
The Secret to Perfect Corners
Wonky corners were my nemesis for the longest time. Then a seamstress friend showed me this technique, and I literally gasped. IT'S SO SIMPLE.
The Box Corner Method:

Instead of trying to ease fabric around corners (nightmare fuel), create box corners for a crisp, professional finish. Our guide on sewing square corners like a pro breaks it down step-by-step.
Special Situation Techniques:
Boat Cushions
Marine environments are tough on cushions. Learn special techniques in our boat cushion sewing guide.
Thick Cushions
Wrestling with 4-inch foam? Been there! Check out tips for handling thick materials.
Curved Edges
Because not everything in life is square (unfortunately for us sewists).
Advanced Styles & Decorative Cushions for the Ambitious
Okay, you've made a few cushions. You're feeling confident. Maybe even a little cocky (good for you!). Ready to blow people's minds? Let's dive into the fancy stuff that'll have your friends begging you to make cushions for them (pro tip: charge them).
📌 Pinterest-Worthy Projects Ahead!
These are the cushions that get repinned a thousand times. The ones that make people say "I could never do that" (spoiler: yes, they could, and so can you).
Project: The No-Zipper Envelope Cover
Zippers still intimidating you? No worries! This envelope-style cover is secretly easier than a zippered one, but looks just as professional.
Why I Love Envelope Covers:
- ✅ No special feet or tools needed
- ✅ Easy to remove for washing
- ✅ Uses less fabric than you'd think
- ✅ Perfect for throw pillows
The Art of Tufting (AKA How to Make Your Cushions Look Expensive)

Tufting is like the cherry on top of your cushion sundae. It adds dimension, elegance, and that "how much did that cost??" factor. Our DIY tufted cushion guide breaks down three different methods.
Quilted Cushion Covers (Yes, You Can Do This!)
I put off trying quilted covers for years because quilting seemed like a whole different craft. Turns out, basic quilting for cushion covers is totally doable! Check out our guide on quilted covers that look store-bought.
🪡 My Quilting Revelation:
You don't need a special quilting machine! A walking foot and some patience are all it takes. I quilt while binge-watching Netflix - multitasking at its finest!
More Decorative Techniques to Try:

Applique Designs
Add personality with fabric cutouts

Embroidered Accents
Hand or machine embroidery for that artisan touch
The Ultimate Challenge: Piped Bench Cushion with Style
Ready for the boss level? Our guide to sewing a piped bench cushion with style combines everything you've learned into one show-stopping project.
Need Some Design Inspiration?
Sometimes the hardest part is deciding what style to make! Browse our collection for ideas:
Rulaer Outdoor Chair Cushion
Chair Cushions come in — thoughtfully designed with comfort-first materials and tailored to suit any style.
Get Inspired
Deep Seat Cushion
Made with premium foam and a skin-friendly fabric, they're designed to provide ultimate comfort.
View Details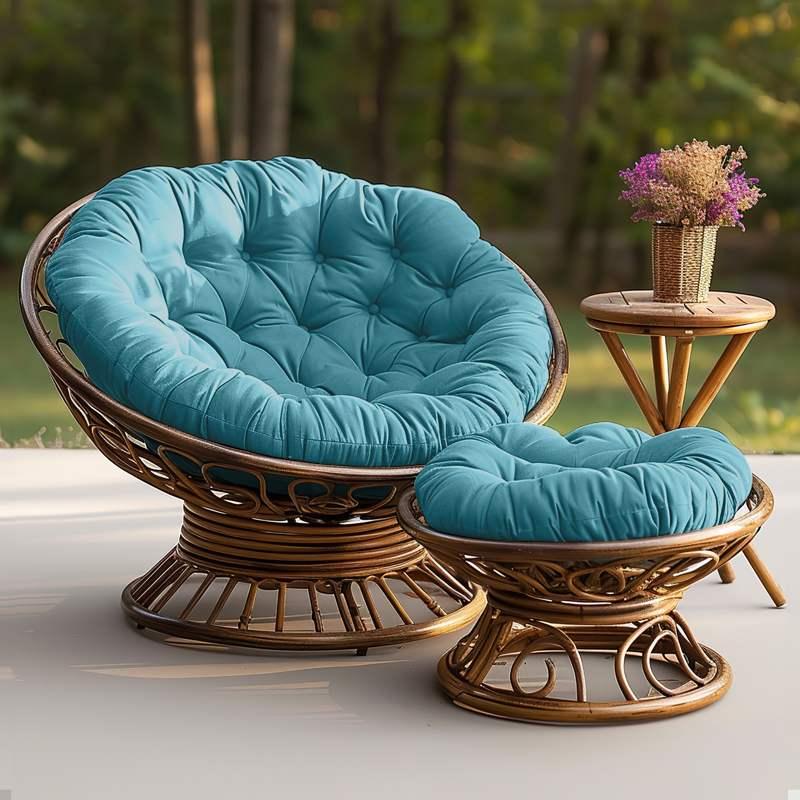
Patio Papasan Cushion
Giving you the perfect spot to lounge, nap, or simply unwind in style.
Shop NowCommon Mistakes I've Made (So You Don't Have To)
Let's have some real talk. I've made every mistake in the book. Twice. Sometimes three times because I'm stubborn like that. Here are my greatest hits (misses?) so you can learn from my cushion catastrophies.
The "It'll Stretch" Delusion
Fabric doesn't stretch as much as you think. If your cover is too small, no amount of wrestling will make it fit. Ask me how I know... actually, don't.
The Fix: Always add that seam allowance. Always.
The Directional Fabric Disaster
Ever sewn a cushion where the birds on one side are flying up and on the other side they're diving down? Yeah, that was a fun discovery.
The Fix: Mark your fabric pieces with arrows before cutting!
The "Close Enough" Measurement
Turns out, 47.5" is not "basically 48 inches." Precision matters, friends.
The Fix: Measure twice, cut once. Or in my case, measure five times because anxiety.
The Upside-Down Zipper
Yes, there's a right way up. Yes, I've sewn them upside down. Multiple times.
The Fix: The pull tab should be at the top when the zipper is closed. Write it on your hand if you must.
The "I Don't Need to Pin" Confidence
Spoiler alert: You need to pin. Or clip. Or baste. Something to keep those layers from shifting!
The Fix: Embrace the pins. They're your friends.
The Foam Thickness Surprise
Ordered 4-inch foam for a cover designed for 2-inch foam. It looked like a overstuffed sausage.
The Fix: Account for foam compression and always make a muslin test if you're unsure!
🎓 The Biggest Lesson I've Learned:
Every "mistake" is just practice in disguise. My first cushion looked like it had been made by someone wearing oven mitts. My latest one? People ask where I bought it. You'll get there too!
Caring for Your Creations
You've put blood, sweat, and tears into your cushions (hopefully not literally with the blood part). Now let's talk about keeping them looking fabulous for years to come.
The Care & Feeding of DIY Cushions
🌧️ For Outdoor Cushions:
- Weather Protection: Even "weatherproof" fabric appreciates some shelter. Store cushions during storms when possible
- Regular Cleaning: Brush off debris weekly, deep clean monthly with mild soap and water
- Sun Exposure: Rotate cushions periodically to prevent uneven fading
- Winter Storage: Clean thoroughly and store in a dry place. I use vacuum storage bags - game changer!
🏠 For Indoor Cushions:
- Regular Fluffing: Prevents permanent indentations and keeps filling distributed
- Spot Cleaning: Act fast! The quicker you treat stains, the better
- Professional Cleaning: Once a year for heavily used pieces
- Rotation: Flip and rotate regularly for even wear
The "Oh No!" Stain Removal Guide
Because life happens, usually involving red wine or chocolate.
Making Your Cushions Last:
Want your DIY cushions to outlast store-bought ones? Here's how:
- Quality Materials: It's worth spending a bit more on good fabric and foam
- Reinforced Seams: Double-stitch stress points like corners
- Washable Covers: Being able to clean them easily = using them more
- Proper Storage: Don't just toss them in the garage!
Design Inspiration & Trending Styles for 2024
Fashion changes, but comfort is forever. That said, why not have both? Here's what's hot in the cushion world right now (yes, that's a thing, and yes, I follow cushion trends unironically).
🔥 What's Trending:

Earthy & Natural Tones
Think terracotta, sage green, warm beiges. Basically, colors that make you want to take a nap.

Texture Mixing
Smooth + nubby, velvet + linen. It's all about that tactile interest!

Statement Stripes
Big, bold stripes are having a moment. Perfect for adding personality!

Sustainable Materials
Recycled fabrics and eco-friendly fills. Good for you, good for Earth!
Finding Your Cushion Style:
Quick Style Assessment:
Answer these to find your cushion personality:
A) Beach walks and farmer's markets → Try natural, coastal vibes
B) Netflix and actual chill → Go for plush, cozy textures
C) Hosting friends → Bold colors and durable fabrics
A) Less is more → Solid colors, quality over quantity
B) More is more → Mix patterns like a pro!
C) Somewhere in between → Try tone-on-tone patterns
Your Cushion Journey Starts Now!
Look, I could talk about cushions all day (and frequently do, much to my family's dismay). But the real magic happens when you pick up that fabric and start creating.
Will your first cushion be perfect? Probably not. Will it be YOURS? Absolutely. And that's what makes it special.
Remember:
- Every expert was once a beginner who refused to give up
- Mistakes are just design opportunities in disguise
- The best cushion is the one that makes you smile when you sit on it
- You've got this! 💪
Ready to Start Your DIY Journey?
Get inspired by our Rulaer collection, then make it your own!
Happy cushion making, friends! And remember - when in doubt, add more piping! 😊